
参考:
macを買って、今すぐherokuでruby1.9.3 + rails3.2しよう!
item2を入れる
どうやらターミナルらしいです。おすすめされたので入れてみます。以下URLにアクセス
http://code.google.com/p/iterm2/
ダウンロードタブを選択します。


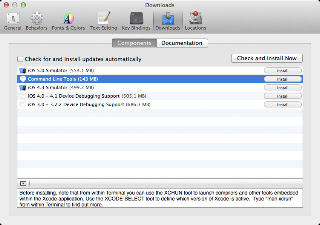
command line tools for xcodeを入れる または Xcodeを入れる
XcodeからCommand Line Tools for Xcodeに切り替えたらHDD使用容量が7GB減ったを参考にがしがし入れます。っていうか、Xcode入ってるんだけどねw
Xcodeのインストールはこちらを参考にどうぞ。
homebrewを入れる
参考サイトのコマンドを叩いたら、404エラーと言われたので、本家で確認。本家サイト:homebrew
先ほど入れたitem2を立ちあげて、以下のコマンドを叩きましょう。
/usr/bin/ruby -e "$(/usr/bin/curl -fsSL https://raw.github.com/mxcl/homebrew/go)"こんな感じ。
途中で、EnterKeyを押せーと行ってくるので、Enterを押しましょう。
homebrewが何者かというと、MacのUNIXツールをインストールするためのパッケージ管理システムだそうです。便利くんってことですね。へー。
詳しくはこちらを参照に。
zshを入れる
好みって言われても使ったことないので、とりま入れるwwbashの拡張ならまだ書ける気がする。。
item2で以下のコマンドを実行する。
brewhome install zsh次にこのコマンドを実行
curl https://raw.github.com/gist/1970184/d7adf527117edd583de7b55141f8d7377a3b6cf6/.zshrc > ~/.zshrc
中身を見る。
設定を反映するため、以下のコマンド実行
source ~/.zshrcシェルを変えるため、以下のコマンドも実行する
sudo sh -c "echo /usr/local/bin/zsh >> /etc/shells"
chsh -s /usr/local/bin/zsh
gitを入れる
gitをインストール。以下のコマンド実行config設定をする。gitのアカウントを持っていたら、その情報と連携させた方がいいんだろうな。。
git config --global user.name "your name"
git config --global user.email "youraddress@example.com"
automakeを入れる
簡単な記述でmakeをしてくれるやつらしい。詳しくはこちらbrewhome install automake実行結果はこんな感じ
rvmを入れる
複数のRubyを管理するツール。bash -s stable < <(curl -s https://raw.github.com/wayneeseguin/rvm/master/binscripts/rvm-installer)パスを通すようにzshrcのファイルを開く
vim ~/.zshrc開いたら、以下の記述を追記する。
# rvm
[[ -s "$HOME/.rvm/scripts/rvm" ]] && . "$HOME/.rvm/scripts/rvm"
ruby1.9.3を入れる
以下のコマンドを実行する。rvm install 1.9.3 --with-gcc=clangするとこんな感じで怒られたorz
You requested building with 'clang' but it is not in your path.どうやら、Xcodeの中からgccがなくなったのが原因っぽい。(参考:rvmによるrubyのアップデートでハマる)
Xcodeからインストールできるみたいなので、commandLineをインストールする。
参考:Mac OS X Lionにしたらgccがなくてnode.jsがコンパイルできなくなった件
gcc -vこんなん出てればOK
Using built-in specs.
Target: i686-apple-darwin11
Configured with: /private/var/tmp/llvmgcc42/llvmgcc42-2336.11~28/src/configure --disable-checking --enable-werror --prefix=/Applications/Xcode.app/Contents/Developer/usr/llvm-gcc-4.2 --mandir=/share/man --enable-languages=c,objc,c++,obj-c++ --program-prefix=llvm- --program-transform-name=/^[cg][^.-]*$/s/$/-4.2/ --with-slibdir=/usr/lib --build=i686-apple-darwin11 --enable-llvm=/private/var/tmp/llvmgcc42/llvmgcc42-2336.11~28/dst-llvmCore/Developer/usr/local --program-prefix=i686-apple-darwin11- --host=x86_64-apple-darwin11 --target=i686-apple-darwin11 --with-gxx-include-dir=/usr/include/c++/4.2.1
Thread model: posix
gcc version 4.2.1 (Based on Apple Inc. build 5658) (LLVM build 2336.11.00)
ようやく戻って、もう一度Rubyをインストール
rvm install 1.9.3 --with-gcc=clangRubyのバージョンを指定します。
rvm use 1.9.3
Rubyのバージョンを確認
ruby -v
ruby 1.9.3p194 (2012-04-20 revision 35410) [x86_64-darwin11.4.0]
次はHerokuの環境構築しまーす。
今日はここまで。
0 件のコメント:
コメントを投稿