
tomcatの起動時に、
UnsupportedEncodingException cp932って出てきたので、
ググって調べてみた。
どうやら、windowsのインストーラー版だと
XMLの文字コードがShift-JISだったり、
XML宣言のencodingがutf-8じゃなかったりするので
その辺を直してやると起動デキました。
無事解決。
参考URL
Tomcat,UnsupportedEncodingExceptionとかで起動しない
http://d.hatena.ne.jp/gnarl/20080805/1217900224
egacreate UnsupportedEncodingException: cp932
http://egacreate.blogspot.jp/2009/03/unsupportedencodingexception-cp932.html
2012年12月10日月曜日
2012年12月4日火曜日
[セキュリティ]一部のリクエストヘッダを書き換えるとブラウザエラーになる
脆弱性の調査をしている時に、リクエストヘッダのHOSTヘッダは書き換えられるのか?という話になり、その時に調べた内容のまとめを書いてきます。
■調査内容
JavaScriptでリクエストヘッダの書き換えは可能なのか?
■対象
Android標準ブラウザ
iPhone iOS5 Safari
PC Chrome
PC Safari
■結果
一部のリクエストヘッダの書き換えは、ブラウザ側でエラーとなる。
■調査詳細
まず、JavaScriptを書いてみた。
リクエスト内容を書き換えたり、任意の内容を送るのは、XMLHTTPRequestを使用する。
参考URL
JavaScript初級者から中級者になろう 十三章第一回 XMLHTTPRequest
ヘッダーを書き換えるには
書いてみたテストページ↓
※IEはめんどいので割愛・・・(ActiveXを呼ばないとダメらしい)
さて、実行してみると、ブラウザ側でこんなエラーが。(キャプチャはSafari)
 『Refused to set unsafe header "Host"』はChromeでも同じスクリプトエラー。
ぐぐってみると、
Chrome拡張でHTTPヘッダを改変
http://lostlinksearch.net/blog/2012/03/chrome%E6%8B%A1%E5%BC%B5%E3%81%A7http%E3%83%98%E3%83%83%E3%83%80%E3%82%92%E6%94%B9%E5%A4%89/
であるように、一部のヘッダはヘッダを指定出来ないそうな。
まあ、セキュリティ上、そうだよなーと納得したところで、調査終了ー(ということにしたw)
さて、実行してみると、ブラウザ側でこんなエラーが。(キャプチャはSafari)
ぐぐってみると、
Chrome拡張でHTTPヘッダを改変
http://lostlinksearch.net/blog/2012/03/chrome%E6%8B%A1%E5%BC%B5%E3%81%A7http%E3%83%98%E3%83%83%E3%83%80%E3%82%92%E6%94%B9%E5%A4%89/
であるように、一部のヘッダはヘッダを指定出来ないそうな。
まあ、セキュリティ上、そうだよなーと納得したところで、調査終了ー(ということにしたw)
2012年11月29日木曜日
ディレクトリ配下の全てのファイルのMD5のハッシュ値一覧を作成する
仕事で調べたのでメモ
MD5のハッシュ値は以下のコマンドで取得しますね。
MD5のハッシュ値は以下のコマンドで取得しますね。
md5sum ファイル名
私の場合は、テキストに吐いて、チェックすることが多いです。
md5sum ファイル名 > ファイル名.md5sum
ま、ファイル名はなんでもいいんですが。
チェックはこれ。
md5sum -c md5のハッシュ値を記述したファイル名
で、この度、特定のディレクトリの配下にあるファイル全てのMD5ハッシュをリストにしてくれと言われたので、ちょっと調べてみた。
特定ディレクトリの配下のファイルのMD5ハッシュは以下のコマンドで取得出来るみたい。
findコマンドと組み合わせて使うんですねー
find 対象のディレクトリ -type f -exec md5sum {} \;
この結果をファイル出力するのは
find 対象のディレクトリ -type f -exec md5sum {} \; > ディレクトリ名.md5sum
チェックする場合は、単一ファイルの場合と同じで、
md5sum -c md5のハッシュ値を記述したファイル名
で全ファイル分チェックしてくれるようです。
しかし、頭いいなーw
2012年10月6日土曜日
[Xcode]プロジェクトを作成する
今回は、Xcodeでプロジェクトを作成するまでをまとめます。
Xcodeのバージョンは、2012/10/06時点で、4.4.1を使用しています。
以下のサイトを参考にさせていただきました(^^♪
絶対に挫折しないiPhoneアプリ開発入門

次の画面では、プロジェクトの情報を入れます。
『Product Name』は、てきとー。ここでは、勉強用なので、studyとしました。


なんかいろいろ揃ってますねー。
次回は、作りながらまとめていきます。
Xcodeのバージョンは、2012/10/06時点で、4.4.1を使用しています。
以下のサイトを参考にさせていただきました(^^♪
絶対に挫折しないiPhoneアプリ開発入門
それでは、Xcodeを起動します。
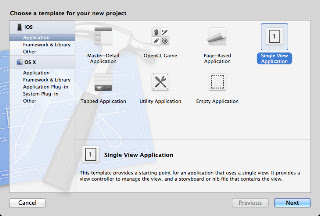
『Create a new Xcode project』をぽちっと選択します。
次の画面が表示されるので、今回は、『Single View Application』を選択し、右下の『next』を押します。
次の画面では、プロジェクトの情報を入れます。
『Product Name』は、てきとー。ここでは、勉強用なので、studyとしました。
『Organization Name』は、組織名を入力。
そんなものはない(笑)ので、ここでもstudyとしました。
『Company Identifier』は、ちょっと大事らしく、App Storeにアプリを申請するときに使用するらしいです。
ドメインを持っている場合は、ドメインの反対から記述するのが通例みたいですね。
『com.xxxxxx.xxxxxx』みたいな感じです。
申請する場合には、サポートサイトが必要らしいので、そこのドメインをひっくり返すとよいかと。
『Devices』には、今回はiPhoneアプリを作る予定なので、iPhoneを選択します。
チェックボックスはそのままで、『next』を押します。
nextを押すと、プロジェクトを保存する場所を聞かれるので、適当なところに保存します。
今回は、デスクトップに保存しました。
プロジェクトが開きました!!
次回は、作りながらまとめていきます。
2012年9月26日水曜日
[Rails]ルーティングについて-初級編-
今回はルーティングの話。初級編ですー
Railsでは、URLから特定のコントローラとアクションを選ぶことを『ルーティング』と呼びます。
ルーティングの設定は、 /config/routes.rb で指定します。
こんな感じですね↓

Railsでは、URLから特定のコントローラとアクションを選ぶことを『ルーティング』と呼びます。
ルーティングの設定は、 /config/routes.rb で指定します。
こんな感じですね↓
アプリケーション名::Application.routes.draw do ルーティングを記述する実際に、アプリケーションに新しいactionを追加して、ルーティングの設定をしてみます。
end
routes.rb に以下を追加
この設定により、『/about』というパスでアクセスが来た時に、TopControllerのaboutアクションを呼び出すようになります。TopControllerにaboutアクションを追加
aboutアクションは特に何もしません。viewを作成
about.html.erbを作成します。ついでに、ちょっとインスタンス変数も使ってます。サーバを起動
サーバを起動します。
rails server
ブラウザから、『http://localhost:3000/about』にアクセスしてみましょう。
こんな表示になればOKです。
[Ruby]日本語使用時の注意
今回は文字コードの話が出たのでメモ
ソースコード内に、コメント以外の定数や出力などで、日本語などのマルチバイトを使用する場合は、マジックコメントが必要だそうです。
ソースを書いて実際にやってみましょう。
単純に標準出力に日本語を表示するだけのソースです。
実行するとこんな感じで表示されます。
ソース内に日本語がある場合は注意が必要です。
ちなみに、文字コードがShift-JISの場合は、
ソースコードに日本語を使用する場合の注意点
ソースコードを保存する際は、『UTF-8』が推奨されていますが、ソースコード内に、コメント以外の定数や出力などで、日本語などのマルチバイトを使用する場合は、マジックコメントが必要だそうです。
ソースを書いて実際にやってみましょう。
単純に標準出力に日本語を表示するだけのソースです。
実行するとこんな感じで表示されます。
$ ruby magic_comments.rbこのマジックコメントで、ちゃんと表示されるわけですね。
はじめまして。
Rubyの文字コードの解釈について
Rubyのデフォルトの文字コードは『US-ASCII』で、マジックコメントがないと、エラーになるんですね。ソース内に日本語がある場合は注意が必要です。
ちなみに、文字コードがShift-JISの場合は、
# coding: Shift_JISと記述すると良いようです。
2012年9月25日火曜日
[Rails][Mac]アプリケーションを作成する
今回はローカルで、アプリケーションを作成する手順のまとめです。
※rubyのインストール等は終わってる前提です。インストール手順などの詳細はこちらを参考にしてください。
これでインストールは完了。
※インストールするrailsのバージョンを指定したい場合は、
次にBundlerでGemパッケージを追加します。
SQLite3とかいろいろ必要なパッケージがインストールされました。
Rubyに付属されているWEBrickというウェブサーバが起動されます。
ブラウザを上げて、『http://localhost:3000』にアクセスしてみましょう。
以下のような画面が出ればOK
 終了する場合は、『control』+『c』で終わります。

いろいろとフォルダができますが、各フォルダの役割は簡単に言うとこんな感じ。
appフォルダの下にもフォルダが分かれており、それぞれに役割があります。
appの下にはファイル名規約があるので、次のサイトを参考にしましょう。
(参考:Railsドキュメント Railsの基礎知識)
Railsの初期画面だと味気ないので、コントローラを作成します。
コンソールに戻って、『rails generate コントローラ名 アクション名』コマンドを実行します。
generateは省略もできて、『rails g 〜』とも書けるようです。
まあ、ともかくコマンド実行しましょう。
実際にファイルを見てみましょうー。
app/controllers/top_controller.rb
TopControllerクラスの中に、indexメソッドができてます。
これが、トップページを表示するアクションになります。
次に、ルーティングの設定をします。
config/route.rb を開いて、以下のように書き換えます。
書き換えたら、public/index.htmlファイルを削除します。
これを消さないと、また同じ画面が表示されることに!!
最後に、ローカルサーバを起動します。

先ほどの画面を表示していたHTMLですね。
Railsのビューのためのテンプレートは、『アクション名』+『.html』+『.erb』というファイル名になります。(HTMLの場合は)
/app/view/top/index.html.erb を開いて、以下のように修正します。
ブラウザを再読み込みすると、表示が変わってますね。

/app/controller/top_controller.rb
@messageを定義して、文字を代入します。
テンプレートの方もmessageを読み込むように修正します。変数をテンプレートで読み込む場合は、<%= %>で変数を囲むんですな。
ブラウザをリロードするとこんな感じ。
 以上、アプリケーション作成入門でした!
※rubyのインストール等は終わってる前提です。インストール手順などの詳細はこちらを参考にしてください。
まずはRailsのインストール
適当なディレクトリを作成します。$ mkdir railsで、作成したディレクトリに移動します。
$ cd railsそこにrailsをインストールします。
$ gem install rails以下のようにいろいろ必要なものをインストールしてくれます。
gem install rails
Fetching: i18n-0.6.1.gem (100%)
Fetching: activesupport-3.2.8.gem (100%)
Fetching: builder-3.0.3.gem (100%)
Fetching: activemodel-3.2.8.gem (100%)
Fetching: rack-1.4.1.gem (100%)
Fetching: rack-cache-1.2.gem (100%)
Fetching: rack-test-0.6.1.gem (100%)
Fetching: journey-1.0.4.gem (100%)
Fetching: hike-1.2.1.gem (100%)
Fetching: tilt-1.3.3.gem (100%)
Fetching: sprockets-2.1.3.gem (100%)
Fetching: erubis-2.7.0.gem (100%)
Fetching: actionpack-3.2.8.gem (100%)
Fetching: arel-3.0.2.gem (100%)
Fetching: tzinfo-0.3.33.gem (100%)
Fetching: activerecord-3.2.8.gem (100%)
Fetching: activeresource-3.2.8.gem (100%)
Fetching: polyglot-0.3.3.gem (100%)
Fetching: treetop-1.4.10.gem (100%)
Fetching: mail-2.4.4.gem (100%)
Fetching: actionmailer-3.2.8.gem (100%)
Fetching: rack-ssl-1.3.2.gem (100%)
Fetching: thor-0.16.0.gem (100%)
Fetching: json-1.7.5.gem (100%)
Building native extensions. This could take a while...
Fetching: rdoc-3.12.gem (100%)
Depending on your version of ruby, you may need to install ruby rdoc/ri data:
<= 1.8.6 : unsupported
= 1.8.7 : gem install rdoc-data; rdoc-data --install
= 1.9.1 : gem install rdoc-data; rdoc-data --install
>= 1.9.2 : nothing to do! Yay!
Fetching: railties-3.2.8.gem (100%)
Fetching: rails-3.2.8.gem (100%)
Successfully installed i18n-0.6.1
Successfully installed activesupport-3.2.8
Successfully installed builder-3.0.3
Successfully installed activemodel-3.2.8
Successfully installed rack-1.4.1
Successfully installed rack-cache-1.2
Successfully installed rack-test-0.6.1
Successfully installed journey-1.0.4
Successfully installed hike-1.2.1
Successfully installed tilt-1.3.3
Successfully installed sprockets-2.1.3
Successfully installed erubis-2.7.0
Successfully installed actionpack-3.2.8
Successfully installed arel-3.0.2
Successfully installed tzinfo-0.3.33
Successfully installed activerecord-3.2.8
Successfully installed activeresource-3.2.8
Successfully installed polyglot-0.3.3
Successfully installed treetop-1.4.10
Successfully installed mail-2.4.4
Successfully installed actionmailer-3.2.8
Successfully installed rack-ssl-1.3.2
Successfully installed thor-0.16.0
Successfully installed json-1.7.5
Successfully installed rdoc-3.12
Successfully installed railties-3.2.8
Successfully installed rails-3.2.8
27 gems installed
Installing ri documentation for i18n-0.6.1...
Installing ri documentation for activesupport-3.2.8...
Installing ri documentation for builder-3.0.3...
Installing ri documentation for activemodel-3.2.8...
Installing ri documentation for rack-1.4.1...
Installing ri documentation for rack-cache-1.2...
Installing ri documentation for rack-test-0.6.1...
Installing ri documentation for journey-1.0.4...
Installing ri documentation for hike-1.2.1...
Installing ri documentation for tilt-1.3.3...
Installing ri documentation for sprockets-2.1.3...
Installing ri documentation for erubis-2.7.0...
Installing ri documentation for actionpack-3.2.8...
Installing ri documentation for arel-3.0.2...
Installing ri documentation for tzinfo-0.3.33...
Installing ri documentation for activerecord-3.2.8...
Installing ri documentation for activeresource-3.2.8...
Installing ri documentation for polyglot-0.3.3...
Installing ri documentation for treetop-1.4.10...
Installing ri documentation for mail-2.4.4...
Installing ri documentation for actionmailer-3.2.8...
Installing ri documentation for rack-ssl-1.3.2...
Installing ri documentation for thor-0.16.0...
Installing ri documentation for json-1.7.5...
Installing ri documentation for rdoc-3.12...
Installing ri documentation for railties-3.2.8...
Installing ri documentation for rails-3.2.8...
Installing RDoc documentation for i18n-0.6.1...
Installing RDoc documentation for activesupport-3.2.8...
Installing RDoc documentation for builder-3.0.3...
Installing RDoc documentation for activemodel-3.2.8...
Installing RDoc documentation for rack-1.4.1...
Installing RDoc documentation for rack-cache-1.2...
Installing RDoc documentation for rack-test-0.6.1...
Installing RDoc documentation for journey-1.0.4...
Installing RDoc documentation for hike-1.2.1...
Installing RDoc documentation for tilt-1.3.3...
Installing RDoc documentation for sprockets-2.1.3...
Installing RDoc documentation for erubis-2.7.0...
Installing RDoc documentation for actionpack-3.2.8...
Installing RDoc documentation for arel-3.0.2...
Installing RDoc documentation for tzinfo-0.3.33...
Installing RDoc documentation for activerecord-3.2.8...
Installing RDoc documentation for activeresource-3.2.8...
Installing RDoc documentation for polyglot-0.3.3...
Installing RDoc documentation for treetop-1.4.10...
Installing RDoc documentation for mail-2.4.4...
Installing RDoc documentation for actionmailer-3.2.8...
Installing RDoc documentation for rack-ssl-1.3.2...
Installing RDoc documentation for thor-0.16.0...
Installing RDoc documentation for json-1.7.5...
Installing RDoc documentation for rdoc-3.12...
Installing RDoc documentation for railties-3.2.8...
Installing RDoc documentation for rails-3.2.8...
これでインストールは完了。
※インストールするrailsのバージョンを指定したい場合は、
gem install rails --version "~> 3.2.1" --no-rdoc --no-riのコマンドを叩くと良いです。
アプリケーションを作成する
アプリケーションを作成します。$ rails new study --skip-bundlerails newコマンドで、『study』ディレクトリを作成して、Railsアプリケーションに必要なフォルダやファイルを作ってくれます。
create『--skip-bundle』オプションをつけているのは、『bundle install』の実行を省略するためです。オプションを付けないと、『bundle install』が自動実行されます。
create README.rdoc
create Rakefile
create config.ru
create .gitignore
create Gemfile
create app
create app/assets/images/rails.png
create app/assets/javascripts/application.js
create app/assets/stylesheets/application.css
create app/controllers/application_controller.rb
create app/helpers/application_helper.rb
create app/mailers
create app/models
create app/views/layouts/application.html.erb
create app/mailers/.gitkeep
create app/models/.gitkeep
create config
create config/routes.rb
create config/application.rb
create config/environment.rb
create config/environments
create config/environments/development.rb
create config/environments/production.rb
create config/environments/test.rb
create config/initializers
create config/initializers/backtrace_silencers.rb
create config/initializers/inflections.rb
create config/initializers/mime_types.rb
create config/initializers/secret_token.rb
create config/initializers/session_store.rb
create config/initializers/wrap_parameters.rb
create config/locales
create config/locales/en.yml
create config/boot.rb
create config/database.yml
create db
create db/seeds.rb
create doc
create doc/README_FOR_APP
create lib
create lib/tasks
create lib/tasks/.gitkeep
create lib/assets
create lib/assets/.gitkeep
create log
create log/.gitkeep
create public
create public/404.html
create public/422.html
create public/500.html
create public/favicon.ico
create public/index.html
create public/robots.txt
create script
create script/rails
create test/fixtures
create test/fixtures/.gitkeep
create test/functional
create test/functional/.gitkeep
create test/integration
create test/integration/.gitkeep
create test/unit
create test/unit/.gitkeep
create test/performance/browsing_test.rb
create test/test_helper.rb
create tmp/cache
create tmp/cache/assets
create vendor/assets/javascripts
create vendor/assets/javascripts/.gitkeep
create vendor/assets/stylesheets
create vendor/assets/stylesheets/.gitkeep
create vendor/plugins
create vendor/plugins/.gitkeep
次にBundlerでGemパッケージを追加します。
$ cd study
$ bundle install
Fetching gem metadata from https://rubygems.org/.........これでインストール完了。
Using rake (0.9.2.2)
Using i18n (0.6.1)
Using multi_json (1.3.6)
Using activesupport (3.2.8)
Using builder (3.0.3)
Using activemodel (3.2.8)
Using erubis (2.7.0)
Using journey (1.0.4)
Using rack (1.4.1)
Using rack-cache (1.2)
Using rack-test (0.6.1)
Using hike (1.2.1)
Using tilt (1.3.3)
Using sprockets (2.1.3)
Using actionpack (3.2.8)
Using mime-types (1.19)
Using polyglot (0.3.3)
Using treetop (1.4.10)
Using mail (2.4.4)
Using actionmailer (3.2.8)
Using arel (3.0.2)
Using tzinfo (0.3.33)
Using activerecord (3.2.8)
Using activeresource (3.2.8)
Using bundler (1.2.0)
Installing coffee-script-source (1.3.3)
Installing execjs (1.4.0)
Installing coffee-script (2.2.0)
Using rack-ssl (1.3.2)
Using json (1.7.5)
Using rdoc (3.12)
Using thor (0.16.0)
Using railties (3.2.8)
Installing coffee-rails (3.2.2)
Installing jquery-rails (2.1.2)
Using rails (3.2.8)
Installing sass (3.2.1)
Installing sass-rails (3.2.5)
Installing sqlite3 (1.3.6) with native extensions
Installing uglifier (1.3.0)
Your bundle is complete! Use `bundle show [gemname]` to see where a bundled gem is installed.
SQLite3とかいろいろ必要なパッケージがインストールされました。
アプリケーションを起動する
先ほど作ったアプリケーションのフォルダに移動して、サーバを起動します。Rubyに付属されているWEBrickというウェブサーバが起動されます。
$ rails server
=> Booting WEBrickこれで起動しました。
=> Rails 3.2.8 application starting in development on http://0.0.0.0:3000
=> Call with -d to detach
=> Ctrl-C to shutdown server
[2012-09-24 07:52:41] INFO WEBrick 1.3.1
[2012-09-24 07:52:41] INFO ruby 1.9.3 (2012-04-20) [x86_64-darwin11.4.0]
[2012-09-24 07:52:41] INFO WEBrick::HTTPServer#start: pid=57972 port=3000
Started GET "/assets/rails.png" for 127.0.0.1 at 2012-09-24 07:52:54 +0900
Connecting to database specified by database.yml
Served asset /rails.png - 200 OK (9ms)
ブラウザを上げて、『http://localhost:3000』にアクセスしてみましょう。
以下のような画面が出ればOK
アプリケーションの構成を見てみる
Macでアプリケーションを作成すると、こんな感じ。いろいろとフォルダができますが、各フォルダの役割は簡単に言うとこんな感じ。
app モデル、ビュー、コントローラのコードを置く
config ルーティングやデータベースなどの設定ファイルを置く
db マイグレーションスクリプトやシードデータを置く
doc 開発者向けのドキュメントを置く
lib 自作ライブラリやrakeファイルを置く
log ログが出力される
public アプリケーションを介さずに、静的ファイルを置く
script スクリプトファイルを置く
test テストケースを書いたテストファイルを置く
tmp キャッシュなどのテンポラリファイル
vender プラグインなどは配置する
appフォルダの下にもフォルダが分かれており、それぞれに役割があります。
appの下にはファイル名規約があるので、次のサイトを参考にしましょう。
(参考:Railsドキュメント Railsの基礎知識)
コントローラとアクションの作成
ようやくコーディングっぽいところに到達(笑)Railsの初期画面だと味気ないので、コントローラを作成します。
コンソールに戻って、『rails generate コントローラ名 アクション名』コマンドを実行します。
generateは省略もできて、『rails g 〜』とも書けるようです。
まあ、ともかくコマンド実行しましょう。
$ rails g controller top indexTopControllerとindexアクションがこれで作成されました。
create app/controllers/top_controller.rb
route get "top/index"
invoke erb
create app/views/top
create app/views/top/index.html.erb
invoke test_unit
create test/functional/top_controller_test.rb
invoke helper
create app/helpers/top_helper.rb
invoke test_unit
create test/unit/helpers/top_helper_test.rb
invoke assets
invoke coffee
create app/assets/javascripts/top.js.coffee
invoke scss
create app/assets/stylesheets/top.css.scss
実際にファイルを見てみましょうー。
app/controllers/top_controller.rb
TopControllerクラスの中に、indexメソッドができてます。
これが、トップページを表示するアクションになります。
次に、ルーティングの設定をします。
config/route.rb を開いて、以下のように書き換えます。
書き換えたら、public/index.htmlファイルを削除します。
これを消さないと、また同じ画面が表示されることに!!
最後に、ローカルサーバを起動します。
rails server以下のように表示されればOK!!
ビューを作成する
次に、indexアクションに対応するテンプレートを編集します。先ほどの画面を表示していたHTMLですね。
Railsのビューのためのテンプレートは、『アクション名』+『.html』+『.erb』というファイル名になります。(HTMLの場合は)
/app/view/top/index.html.erb を開いて、以下のように修正します。
ブラウザを再読み込みすると、表示が変わってますね。
変数を表示する
ベタ書きだとつまらんので、変数を使ってみます。/app/controller/top_controller.rb
@messageを定義して、文字を代入します。
テンプレートの方もmessageを読み込むように修正します。変数をテンプレートで読み込む場合は、<%= %>で変数を囲むんですな。
ブラウザをリロードするとこんな感じ。
2012年9月17日月曜日
[Mac][Heroku]MacでHeroku環境構築
前回のMacでRuby環境構築でRubyの環境構築までできたので、
今回はHerokuを使ってみようの会ですw
今回の参考先もmacを買って、今すぐherokuでruby1.9.3 + rails3.2しよう!ですww
ありがとうございますm(__)m
Herokuの登録は
macを買って、今すぐherokuでruby1.9.3 + rails3.2しよう!
の『herokuアカウントを作成』から読んでね。
アカウントが作成出来たら、参考先をそのまま続けてやってきましょうー。
以下コマンドを打って、Enterを押すと出来上がり。
herokuアカウントのメアドとパスワードを入力して
Authentication successful. って言われたらOK。
2012/09/17時点で、railsの最新が3.2.8だったので、それを入れてみます。
が、ここではデフォルトでいきますw
次に、サンプルアプリの中のディレクトリに移動します。
gitの使い方は、Git入門で。
次に、最低限のgemを記述します。(といってもコンソールでコマンド叩くだけ)
Gemfileの中を見てみましょう。
herokuにdeployする
どうやらうまくいったみたい。
作成したアプリを見てみましょう。
以下、コマンドを打つと、safariが起動します。
 ようやく完了!
scaffoldでブックマークアプリを作ります。
migrationするので、一旦メンテナンスモードにします。
migrationとは、Rubyスクリプトによって、テーブルの作成やカラムの構成変更を行う機能のこと。
詳しくは、次のサイトを参考にしてください。
(参考サイト:Ruby on Rails : migration 機能でデータベーススキーマを変更する)
それでは、メンテナンスモードに切り替えます。メンテナンスモードなので、エラーが表示されなくなります。

今回はHerokuを使ってみようの会ですw
今回の参考先もmacを買って、今すぐherokuでruby1.9.3 + rails3.2しよう!ですww
ありがとうございますm(__)m
Herokuの登録は
macを買って、今すぐherokuでruby1.9.3 + rails3.2しよう!
の『herokuアカウントを作成』から読んでね。
アカウントが作成出来たら、参考先をそのまま続けてやってきましょうー。
ssh公開鍵を作成する
以下コマンドを打って、Enterを押すと出来上がり。
$ ssh-keygen -b 2048
Generating public/private rsa key pair.
Enter file in which to save the key (/Users/xxxx/.ssh/id_rsa): ←Enter押す
Created directory '/Users/xxxx/.ssh'.
Enter passphrase (empty for no passphrase): ←入力せずにEnter押す
Enter same passphrase again: ←入力せずEnter押す
Your identification has been saved in /Users/xxxx/.ssh/id_rsa.
Your public key has been saved in /Users/xxxx/.ssh/id_rsa.pub.
fingerprintとか表示されるので、眺めて終了。
作った公開鍵を登録
作った公開鍵を登録
heroku keys:add
rvm gemsetを作成する
rvm gemsetってなんじゃらホイと思ってぐぐってみました。
RVM gemset とは?によると、rubyのバージョンと使用用途によってgemの組み合わせやバージョンを管理できるようになる仕組みのようです。
開発環境によって、組み合わせが変わったりできるとか。
次のサイトで、賢い使い方がわかりやすく載ってたので、使う場合は参考にすると良いかと。(参考サイト:rvm のgemsetをおさらい(Mac でRuby))
とりあえず、heroku用のgemsetを作って見ましょうー。
以下のコマンドでOK。
rvm --create 1.9.3-p194@heroku-samplegemでherokuをインストールもしちゃいます。
$ gem install heroku --no-ri --no-rdoc
Fetching: excon-0.16.2.gem (100%)
Fetching: heroku-api-0.3.5.gem (100%)
Fetching: netrc-0.7.7.gem (100%)
Fetching: mime-types-1.19.gem (100%)
Fetching: rest-client-1.6.7.gem (100%)
Fetching: addressable-2.3.2.gem (100%)
Fetching: launchy-2.1.2.gem (100%)
Fetching: rubyzip-0.9.9.gem (100%)
Fetching: heroku-2.31.2.gem (100%)
! Heroku recommends using the Heroku Toolbelt to install the CLI.
! Download it from: https://toolbelt.heroku.com
Successfully installed excon-0.16.2
Successfully installed heroku-api-0.3.5
Successfully installed netrc-0.7.7
Successfully installed mime-types-1.19
Successfully installed rest-client-1.6.7
Successfully installed addressable-2.3.2
Successfully installed launchy-2.1.2
Successfully installed rubyzip-0.9.9
Successfully installed heroku-2.31.2
9 gems installed
Herokuにログインする
herokuにログインします。heroku login
herokuアカウントのメアドとパスワードを入力して
Authentication successful. って言われたらOK。
rails3.2.2をインストール
railsをインストールします。2012/09/17時点で、railsの最新が3.2.8だったので、それを入れてみます。
gem install rails --version 3.2.8 --no-ri --no-rdocこんなかんじでインストールされて完了。
アプリを作成する
railsアプリをまず作ります。rails new heroku-samplemysqlとか使いたかったら、-d mysqlオプションとか入れるといいらしいです。
が、ここではデフォルトでいきますw
次に、サンプルアプリの中のディレクトリに移動します。
cd heroku-samplegitを初期化します。
gitの使い方は、Git入門で。
次に、最低限のgemを記述します。(といってもコンソールでコマンド叩くだけ)
Gemfileの中を見てみましょう。
vi Gemfile開発では、sqlite3で、本番だとpostgreSQLだったりするんですな。ふむふむ。
herokuにアプリを作成する
以下コマンドを実行herokuにdeployする
どうやらうまくいったみたい。
作成したアプリを見てみましょう。
以下、コマンドを打つと、safariが起動します。
heroku open
scaffoldでアプリを作る
まずは、デフォルト表示されるindex.htmlを消します。scaffoldでブックマークアプリを作ります。
migrationするので、一旦メンテナンスモードにします。
migrationとは、Rubyスクリプトによって、テーブルの作成やカラムの構成変更を行う機能のこと。
詳しくは、次のサイトを参考にしてください。
(参考サイト:Ruby on Rails : migration 機能でデータベーススキーマを変更する)
それでは、メンテナンスモードに切り替えます。メンテナンスモードなので、エラーが表示されなくなります。
heroku maintenance:onherokuにdeployします。
git push heroku masterheroku側もmigrateします。
heroku run rake db:migrateメンテナンスモードを解除します。
heroku maintenance:offherokuを開いて確認
heroku openこんな画面が開いたらOK
herokuでアプリ公開まで出来ました!
2012年9月13日木曜日
[Mac][Ruby]MacでRuby環境構築
Windowsでの構築に挫折した(笑)ので、Macでの環境構築にトライ\(^o^)/
参考:
macを買って、今すぐherokuでruby1.9.3 + rails3.2しよう!
以下URLにアクセス
http://code.google.com/p/iterm2/
ダウンロードタブを選択します。
 currentって書いてる方をダウンロード
 zip展開したら終わり
っていうか、Xcode入ってるんだけどねw
Xcodeのインストールはこちらを参考にどうぞ。
本家サイト:homebrew
先ほど入れたitem2を立ちあげて、以下のコマンドを叩きましょう。
途中で、EnterKeyを押せーと行ってくるので、Enterを押しましょう。
homebrewが何者かというと、MacのUNIXツールをインストールするためのパッケージ管理システムだそうです。便利くんってことですね。へー。
詳しくはこちらを参照に。
bashの拡張ならまだ書ける気がする。。
item2で以下のコマンドを実行する。
中身を見る。
設定を反映するため、以下のコマンド実行
config設定をする。gitのアカウントを持っていたら、その情報と連携させた方がいいんだろうな。。
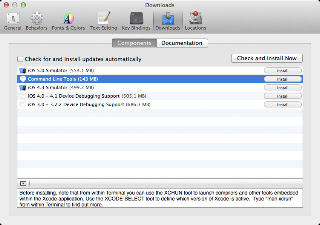
Xcodeからインストールできるみたいなので、commandLineをインストールする。
参考:Mac OS X Lionにしたらgccがなくてnode.jsがコンパイルできなくなった件
 インストールが終わったら、gccが入ったことを確認
ようやく戻って、もう一度Rubyをインストール
次はHerokuの環境構築しまーす。
今日はここまで。
参考:
macを買って、今すぐherokuでruby1.9.3 + rails3.2しよう!
item2を入れる
どうやらターミナルらしいです。おすすめされたので入れてみます。以下URLにアクセス
http://code.google.com/p/iterm2/
ダウンロードタブを選択します。
command line tools for xcodeを入れる または Xcodeを入れる
XcodeからCommand Line Tools for Xcodeに切り替えたらHDD使用容量が7GB減ったを参考にがしがし入れます。っていうか、Xcode入ってるんだけどねw
Xcodeのインストールはこちらを参考にどうぞ。
homebrewを入れる
参考サイトのコマンドを叩いたら、404エラーと言われたので、本家で確認。本家サイト:homebrew
先ほど入れたitem2を立ちあげて、以下のコマンドを叩きましょう。
/usr/bin/ruby -e "$(/usr/bin/curl -fsSL https://raw.github.com/mxcl/homebrew/go)"こんな感じ。
途中で、EnterKeyを押せーと行ってくるので、Enterを押しましょう。
homebrewが何者かというと、MacのUNIXツールをインストールするためのパッケージ管理システムだそうです。便利くんってことですね。へー。
詳しくはこちらを参照に。
zshを入れる
好みって言われても使ったことないので、とりま入れるwwbashの拡張ならまだ書ける気がする。。
item2で以下のコマンドを実行する。
brewhome install zsh次にこのコマンドを実行
curl https://raw.github.com/gist/1970184/d7adf527117edd583de7b55141f8d7377a3b6cf6/.zshrc > ~/.zshrc
中身を見る。
設定を反映するため、以下のコマンド実行
source ~/.zshrcシェルを変えるため、以下のコマンドも実行する
sudo sh -c "echo /usr/local/bin/zsh >> /etc/shells"
chsh -s /usr/local/bin/zsh
gitを入れる
gitをインストール。以下のコマンド実行config設定をする。gitのアカウントを持っていたら、その情報と連携させた方がいいんだろうな。。
git config --global user.name "your name"
git config --global user.email "youraddress@example.com"
automakeを入れる
簡単な記述でmakeをしてくれるやつらしい。詳しくはこちらbrewhome install automake実行結果はこんな感じ
rvmを入れる
複数のRubyを管理するツール。bash -s stable < <(curl -s https://raw.github.com/wayneeseguin/rvm/master/binscripts/rvm-installer)パスを通すようにzshrcのファイルを開く
vim ~/.zshrc開いたら、以下の記述を追記する。
# rvm
[[ -s "$HOME/.rvm/scripts/rvm" ]] && . "$HOME/.rvm/scripts/rvm"
ruby1.9.3を入れる
以下のコマンドを実行する。rvm install 1.9.3 --with-gcc=clangするとこんな感じで怒られたorz
You requested building with 'clang' but it is not in your path.どうやら、Xcodeの中からgccがなくなったのが原因っぽい。(参考:rvmによるrubyのアップデートでハマる)
Xcodeからインストールできるみたいなので、commandLineをインストールする。
参考:Mac OS X Lionにしたらgccがなくてnode.jsがコンパイルできなくなった件
gcc -vこんなん出てればOK
Using built-in specs.
Target: i686-apple-darwin11
Configured with: /private/var/tmp/llvmgcc42/llvmgcc42-2336.11~28/src/configure --disable-checking --enable-werror --prefix=/Applications/Xcode.app/Contents/Developer/usr/llvm-gcc-4.2 --mandir=/share/man --enable-languages=c,objc,c++,obj-c++ --program-prefix=llvm- --program-transform-name=/^[cg][^.-]*$/s/$/-4.2/ --with-slibdir=/usr/lib --build=i686-apple-darwin11 --enable-llvm=/private/var/tmp/llvmgcc42/llvmgcc42-2336.11~28/dst-llvmCore/Developer/usr/local --program-prefix=i686-apple-darwin11- --host=x86_64-apple-darwin11 --target=i686-apple-darwin11 --with-gxx-include-dir=/usr/include/c++/4.2.1
Thread model: posix
gcc version 4.2.1 (Based on Apple Inc. build 5658) (LLVM build 2336.11.00)
ようやく戻って、もう一度Rubyをインストール
rvm install 1.9.3 --with-gcc=clangRubyのバージョンを指定します。
rvm use 1.9.3
Rubyのバージョンを確認
ruby -v
ruby 1.9.3p194 (2012-04-20 revision 35410) [x86_64-darwin11.4.0]
次はHerokuの環境構築しまーす。
今日はここまで。
2012年9月12日水曜日
[Ruby]初心者のためのRubyまとめ
Rubyの勉強がてらにまとめてみます。
初心者とは言いつつ、ある程度用語が出てくるかもしれないので、そのへんは許して下さいw
なるべくわかりやすいようにまとめるつもりです。
順次更新予定。
参考図書はこちら
初心者とは言いつつ、ある程度用語が出てくるかもしれないので、そのへんは許して下さいw
なるべくわかりやすいようにまとめるつもりです。
順次更新予定。
参考図書はこちら
- 記述の仕方
- ソースコードについて
[Ruby]1-1 変数とは-ローカル変数編-
参考:
変数自体にオブジェクトをコピーして格納するのではなく、どこかに存在するオブジェクトの名札にすぎない。なので、名札自体にデータ型とかは存在しない、ということ。
詳細は上記のリンクで解説されていますのでチラ見しましょうw
Rubyでは、変数はローカル変数、 インスタンス変数、 クラス変数、 グローバル変数、 定数に区別されます。名前によって、その区分が分かれるので、まずはローカル変数から見てきましょう。
『_』アンダースコア
英数字
※先頭に数字は使用できないので注意
こんな感じ
○ abc
× 1_to_100
予約語
rubyで予約されている文字列(ローカル変数として使用できない文字列)は以下
nil
true
false
not
or
and
BEGINE
END
begin
end
do
then
yield
rescue
ensure
class
module
def
defined?
alias
undef
super
self
return
while
until
for
in
break
next
redo
retry
case
when
if
unless
else
elsif
__LINE__
__FILE__
__ENCODING__ ※Ruby1.9系のみ
いっぱいあるけど、そのうち出てくるので、覚えなくともなんとなくわかってくるはず!(笑)
■スコープについて
最初に代入式が使用された位置から、その代入を含むブロックまたはメソッド定義の終わりまで。要は、メソッド内でしか動作しない変数です。
メソッドの外から、メソッド内で使用されているローカル変数は参照出来ない。
最初はよくわからないかもしれないので、動作を実際に見てみる方が早いですね。
以下で振る舞いの確認。
今回はここまで!
目次に戻る
■変数
変数とは、他のプログラミング言語だと『物を入れる箱』のイメージのものだが、Rubyは『箱(入れ物)』ではなく、『名札』のイメージ。変数自体にオブジェクトをコピーして格納するのではなく、どこかに存在するオブジェクトの名札にすぎない。なので、名札自体にデータ型とかは存在しない、ということ。
詳細は上記のリンクで解説されていますのでチラ見しましょうw
Rubyでは、変数はローカル変数、 インスタンス変数、 クラス変数、 グローバル変数、 定数に区別されます。名前によって、その区分が分かれるので、まずはローカル変数から見てきましょう。
■ローカル変数とは
ローカル変数は、メソッド内などの特定の範囲内で使用出来る変数で、次に出てくる識別子で始まります。■ローカル変数の識別子
ローカル変数で使用出来るのは、以下の文字列。『_』アンダースコア
英数字
※先頭に数字は使用できないので注意
こんな感じ
○ abc
× 1_to_100
予約語
rubyで予約されている文字列(ローカル変数として使用できない文字列)は以下
nil
true
false
not
or
and
BEGINE
END
begin
end
do
then
yield
rescue
ensure
class
module
def
defined?
alias
undef
super
self
return
while
until
for
in
break
next
redo
retry
case
when
if
unless
else
elsif
__LINE__
__FILE__
__ENCODING__ ※Ruby1.9系のみ
いっぱいあるけど、そのうち出てくるので、覚えなくともなんとなくわかってくるはず!(笑)
■スコープについて
最初に代入式が使用された位置から、その代入を含むブロックまたはメソッド定義の終わりまで。要は、メソッド内でしか動作しない変数です。
メソッドの外から、メソッド内で使用されているローカル変数は参照出来ない。
最初はよくわからないかもしれないので、動作を実際に見てみる方が早いですね。
以下で振る舞いの確認。
今回はここまで!
目次に戻る
2012年9月5日水曜日
[Heroku][windows]Herokuを使い始めてみた
全然触ったことなかったので、
使ってみようかと。
というか、サーバ構築があんまりうまくいってないので、先に開発環境だけでも作りたい。。
というわけで、Windowsでいろいろやってみようー
http://www.heroku.com/
アカウントを作りましょう。
で、ログインをする。
ステップ1はログインなので、無視して、
ステップ2のToolbeltのリンクをポチる。
言われるがままにToolbeltをインストールする。
1.toolbeltのリンクから以下の画面に遷移し、ダウンロードボタンをポチる。

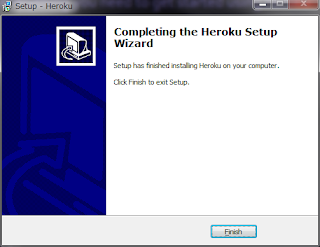
2.ダウンロードが完了したら、『heroku-toolbelt.exe』をクリック。
するとインストール画面が起動する。『Next』ボタンをポチる


■Herokuを起動する
https://toolbelt.heroku.com/
上記の『Getting Start』にある通りにコマンドプロンプトからコマンドを打ち込む
○SSHのKeyを作る
メアドとか入力してYesして作られるのを待つ

○適当なディレクトリを作って、その下にプロジェクトを作成する

なんか出来たっぽいが、操作がわからないので、また次回
使ってみようかと。
というか、サーバ構築があんまりうまくいってないので、先に開発環境だけでも作りたい。。
というわけで、Windowsでいろいろやってみようー
■Heroku にアカウント作成
まずはHerokuにアクセス。http://www.heroku.com/
アカウントを作りましょう。
で、ログインをする。
■Toolbeltをインストール
Herokuにログインすると、クイックスタートのリンクがあるので、ポチる。ステップ1はログインなので、無視して、
ステップ2のToolbeltのリンクをポチる。
言われるがままにToolbeltをインストールする。
1.toolbeltのリンクから以下の画面に遷移し、ダウンロードボタンをポチる。

2.ダウンロードが完了したら、『heroku-toolbelt.exe』をクリック。
するとインストール画面が起動する。『Next』ボタンをポチる

3.黙って『Next』

4.なんかFullでインストールすると言うので、やっぱり黙って『Next』ポチる

5.こんだけインストールするよ、と言ってるのを確認して、『Install』ボタンをポチる。
Gitも入るのね。ラッキー

6.ガリガリインストールするのを黙って放置して、終わったらFinish。

■Herokuを起動する
https://toolbelt.heroku.com/
上記の『Getting Start』にある通りにコマンドプロンプトからコマンドを打ち込む
○SSHのKeyを作る
メアドとか入力してYesして作られるのを待つ

○適当なディレクトリを作って、その下にプロジェクトを作成する
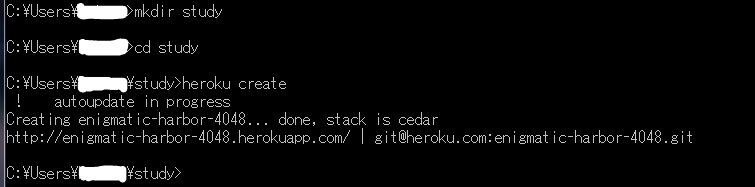
なんか出来たっぽいが、操作がわからないので、また次回
2012年8月1日水曜日
[Rails][Linux]Apache+Passengerを入れる
WEBrickを起動したけど、ブラウザ接続できなかったので、おとなしくPassengerを入れることにした。
参考にさせていただきましたm(__)m
ApacheをWEBサーバとして利用
まずは、passengerをインストール
$ gem install passenger
Fetching: fastthread-1.0.7.gem (100%)
Building native extensions. This could take a while...
Fetching: daemon_controller-1.0.0.gem (100%)
Fetching: passenger-3.0.15.gem (100%)
Successfully installed fastthread-1.0.7
Successfully installed daemon_controller-1.0.0
Successfully installed passenger-3.0.15
3 gems installed
Installing ri documentation for fastthread-1.0.7...
Installing ri documentation for daemon_controller-1.0.0...
Installing ri documentation for passenger-3.0.15...
Installing RDoc documentation for fastthread-1.0.7...
Installing RDoc documentation for daemon_controller-1.0.0...
Installing RDoc documentation for passenger-3.0.15...
対話式でモジュールをインストール
$ passenger-install-apache2-module
なんかいろいろ入ってないよー。でも心配しないで!
足りないやつをインストールする方法教えるから!
みたいなこと言われます。親切ですね。
私の環境で足りなかったのは以下。
Installation instructions for required software
* To install Curl development headers with SSL support:
Please download Curl from http://curl.haxx.se/libcurl and make sure you install it with SSL support.
* To install Apache 2 development headers:
Please download it from http://httpd.apache.org/
* To install Apache Portable Runtime (APR) development headers:
Please download it from http://httpd.apache.org/
(APR is an integrated part of Apache.)
* To install Apache Portable Runtime Utility (APU) development headers:
Please download it from http://httpd.apache.org/
(APR Utility is an integrated part of Apache.)
まずは、curlをインストール
$ sudo yum install curl-devel
次、Apache 2 development headers
$ sudo yum install httpd-devel
んで、もう一回モジュールをインストールする。
成功すると、httpd.conf とかにいろいろ書くんだよーと教えてくれるので、メモしましょう。
The Apache 2 module was successfully installed.
Please edit your Apache configuration file, and add these lines:
LoadModule passenger_module /usr/local/ruby/lib/ruby/gems/1.9.1/gems/passenger-3.0.15/ext/apache2/mod_passenger.so
PassengerRoot /usr/local/ruby/lib/ruby/gems/1.9.1/gems/passenger-3.0.15
PassengerRuby /usr/local/ruby/bin/ruby
After you restart Apache, you are ready to deploy any number of Ruby on Rails
applications on Apache, without any further Ruby on Rails-specific
configuration!
Press ENTER to continue.
--------------------------------------------
Deploying a Ruby on Rails application: an example
Suppose you have a Rails application in /somewhere. Add a virtual host to your
Apache configuration file and set its DocumentRoot to /somewhere/public:
<VirtualHost *:80>
ServerName www.yourhost.com
# !!! Be sure to point DocumentRoot to 'public'!
DocumentRoot /somewhere/public
<Directory /somewhere/public>
# This relaxes Apache security settings.
AllowOverride all
# MultiViews must be turned off.
Options -MultiViews
</Directory>
</VirtualHost>
And that's it! You may also want to check the Users Guide for security and
optimization tips, troubleshooting and other useful information:
/usr/local/ruby/lib/ruby/gems/1.9.1/gems/passenger-3.0.15/doc/Users guide Apache.html
Enjoy Phusion Passenger, a product of Phusion (www.phusion.nl) :-)
https://www.phusionpassenger.com
Phusion Passenger is a trademark of Hongli Lai & Ninh Bui.
apacheのhttpd.confに、
LoadModule passenger_module /usr/local/ruby/lib/ruby/gems/1.9.1/gems/passenger-3.0.15/ext/apache2/mod_passenger.so
PassengerRoot /usr/local/ruby/lib/ruby/gems/1.9.1/gems/passenger-3.0.15
PassengerRuby /usr/local/ruby/bin/ruby
<VirtualHost *:80>
ServerName www.yourhost.com
# !!! Be sure to point DocumentRoot to 'public'!
DocumentRoot /somewhere/public
<Directory /somewhere/public>
# This relaxes Apache security settings.
AllowOverride all
# MultiViews must be turned off.
Options -MultiViews
</Directory>
</VirtualHost>
を書いたら、apacheを再起動
$ service httpd restart
http://ドメイン/ にアクセスし、Welcome aboard の画面が出たら成功!
ようやっとできた~
[Rails][Linux]ちょっぱやでブログサイトを作る
なによりも動かさないことにはわからん。
ので、Railsでよく紹介される、ちょっぱやでブログサイトを作ってみる。
がっつり参考にさせていただきました。
簡単!Rails3.2を使って10分でブログアプリを構築する方法
http://dqn.sakusakutto.jp/2012/03/rails32blog.html
まずは、プロジェクト(アプリケーション)を作成
$ rails new project(プロジェクト名)
$ cd project
$ vi GemFile
GemFileを編集して以下追加
$ gem 'execjs'
$ gem 'therubyracer'
サーバ起動
$ rails server
Could not find gem 'therubyracer (>= 0) ruby' in the gems available on this machine.
Run `bundle install` to install missing gems.
ええー
therubyracerがgemに登録されてないんだって。ましーんにないんだってさ。
懲りずに入れましょう。
$ gem install therubyracer
Fetching: libv8-3.3.10.4-x86_64-linux.gem (100%)
Fetching: therubyracer-0.10.1.gem (100%)
Building native extensions. This could take a while...
Successfully installed libv8-3.3.10.4-x86_64-linux
Successfully installed therubyracer-0.10.1
2 gems installed
Installing ri documentation for libv8-3.3.10.4-x86_64-linux...
Installing ri documentation for therubyracer-0.10.1...
Installing RDoc documentation for libv8-3.3.10.4-x86_64-linux...
Installing RDoc documentation for therubyracer-0.10.1...
無事完了。
サーバ起動に再びトライ
rails server
=> Booting WEBrick
=> Rails 3.2.7 application starting in development on http://0.0.0.0:3000
=> Call with -d to detach
=> Ctrl-C to shutdown server
[2012-07-31 16:42:04] INFO WEBrick 1.3.1
[2012-07-31 16:42:04] INFO ruby 1.9.3 (2012-04-20) [x86_64-linux]
[2012-07-31 16:42:04] INFO WEBrick::HTTPServer#start: pid=8141 port=3000
なんかよさそう。
http://localhost:3000/
にアクセスして、Welcome aboard画面が出ればOK
って出ません!!!Σ(´∀`;)
なんか別の理由っぽい気がするので
続きはまた次回。。
[Rails][Linux]Railsアプリケーションを作成する
環境設定が終わったら、次はアプリケーションの作成\(^o^)/
rails new プロジェクト名 で基本的なディレクトリや各種スクリプトが生成される。
$ rails new プロジェクト名
create
create README.rdoc
create Rakefile
create config.ru
create .gitignore
create Gemfile
create app
create app/assets/images/rails.png
create app/assets/javascripts/application.js
--(省略)--
でろでろといろいろ生成してくれます。
と思ってたら、
An error occured while installing sqlite3 (1.3.6), and Bundler cannot continue.
Make sure that `gem install sqlite3 -v '1.3.6'` succeeds before bundling.
なんてエラーが出てた。。
要は、sqlite3がないよーーと言いたいのね。
今回は特にDBにはこだわってないので、sqliteを入れることにしよう。
実行しろと言ってるコマンドを実行
$ gem install sqlite3 -v '1.3.6'
そしてまたエラー。。
Building native extensions. This could take a while...
ERROR: Error installing sqlite3:
ERROR: Failed to build gem native extension.
/usr/local/ruby/bin/ruby extconf.rb
checking for sqlite3.h... no
sqlite3.h is missing. Try 'port install sqlite3 +universal'
or 'yum install sqlite-devel' and check your shared library search path (the
location where your sqlite3 shared library is located).
*** extconf.rb failed ***
なんかyumで入れてから実行しろやってこと??
お望み通り実行
$ sudo yum install sqlite-devel
(省略)
Downloading Packages:
sqlite-devel-3.6.20-1.8.amzn1.x86_64.rpm | 79 kB 00:00
Running rpm_check_debug
Running Transaction Test
Transaction Test Succeeded
Running Transaction
Installing : sqlite-devel-3.6.20-1.8.amzn1.x86_64 1/1
Installed:
sqlite-devel.x86_64 0:3.6.20-1.8.amzn1
Complete!
はい、入りましたよー
で、もう一回。
$ gem install sqlite3 -v '1.3.6'
Building native extensions. This could take a while...
Successfully installed sqlite3-1.3.6
1 gem installed
Installing ri documentation for sqlite3-1.3.6...
Installing RDoc documentation for sqlite3-1.3.6...
今度はうまくいったみたい。
というわけで、今度こそプロジェクト作成コマンド実行。
Your bundle is complete! Use `bundle show [gemname]` to see where a bundled gem is installed.
成功ー!!
どうやらカレントディレクトリの配下にアプリケーションが生成されるので、
/var/www/ の下など、任意の場所に作ると良いみたいです。
[Rails][Linux]Railsをインストールする
Linux環境にRailsをインストール
私はいつぞやか立てたAWSのサーバを使用しています。
まずは作業用ディレクトリを作成
$ mkdir ruby_install_workdir
$ cd ruby_install_workdir
Rubyの公式サイトから最新のソースコードをダウンロード
$ wget ftp://ftp.ruby-lang.org/pub/ruby/1.9/ruby-1.9.3-p194.tar.gz
圧縮ファイルを展開する
$ tar zxvf ruby-1.9.3-p194.tar.gz
展開したら移動
$ cd ruby-1.9.3-p194
rubyをコンパイルしてインストール
$ ./configure --prefix=/usr/local/ruby
とここでエラー。。
$ ./configure --prefix=/usr/local/ruby
checking build system type... x86_64-unknown-linux-gnu
checking host system type... x86_64-unknown-linux-gnu
checking target system type... x86_64-unknown-linux-gnu
checking for gcc... no
checking for cc... no
checking for cl.exe... no
configure: error: in `/home/---/ruby_install_workdir/ruby-1.9.3-p194':
configure: error: no acceptable C compiler found in $PATH
See `config.log' for more details
どうやらコンパイラーがないらしい。
http://news.trippyboy.com/serversmanvps/serversmanvps-configure-error-no-acceptable-c-compiler-found-in-path/
sudo yum -y install gcc
でインストール
で、気を取り直してもう一回。
$ ./configure --prefix=/usr/local/ruby
--省略--
checking for pthread.h... yes
checking for if make is GNU make... ./configure: line 17125: make: command not found
no
checking for safe null command for make... configure: error: no candidate for safe null command
まさかのmakeがインストールされていない件orz
慌てずyumでインストール
$ sudo yum install make
で、気を取り直してもう一回。
$ ./configure --prefix=/usr/local/ruby
$ make
$ sudo make install
結構時間が掛かるので、のんびりしましょう。
コマンド実行が出来るように環境変数PATHを設定しておく
$ export PATH=/usr/local/ruby/bin:$PATH
rubyのバージョンを確認
$ ruby -v
ruby 1.9.3p194 (2012-04-20 revision 35410) [x86_64-linux]
最後にRailsをインストール
$ sudo gem install rails
libyamlがないYO!と言い出したので、そいつもインストール
http://maeda.farend.ne.jp/blog/2012/03/10/ruby-missing-pysh/
$ sudo rpm -Uvh http://dl.fedoraproject.org/pub/epel/5/i386/epel-release-5-4.noarch.rpm
$ sudo yum install libyaml-devel
YAMLもないって言い出した。。うう
$ wget http://pyyaml.org/download/libyaml/yaml-0.1.4.tar.gz
$ ./configure
$ make
# make install
どうやら、AmazonLinuxの素の状態だと、いろいろ足りないらしいので、他にもコケないよういれておく
http://d.hatena.ne.jp/the_yokochi/20111127/1322382198
$ sudo yum groupinstall "Development Tools"
$ sudo yum install openssl-devel readline-devel zlib-devel libyaml-devel
再度rubyをコンパイルする。
終わったらgemが使用出来るか確認
$ gem -v
1.8.23
最後にRailsをインストール
$ gem install rails
Railsのバージョンを確認
$ rails -v
長かった。。。
2012年7月30日月曜日
[Rails][Ruby]初心者のためのRuby on Railsまとめ
Ruby超初心者がRailsを入れて勉強ー。
随時更新予定。
参考図書
■インストール編
[Rails][Linux]Railsをインストールする
【Windows編】Railsをインストール ※準備中
【Mac編】Railsをインストール ※準備中
■いろいろ準備編
[Linux]Railsアプリケーションを作成する
[Mac]アプリケーションを作成する
■入門編
[Linux]ちょっぱやでブログサイトを作る
■サーバ編
[Rails][Linux]Apache+Passengerを入れる
随時更新予定。
参考図書
■インストール編
[Rails][Linux]Railsをインストールする
【Windows編】Railsをインストール ※準備中
【Mac編】Railsをインストール ※準備中
■いろいろ準備編
[Linux]Railsアプリケーションを作成する
[Mac]アプリケーションを作成する
■入門編
[Linux]ちょっぱやでブログサイトを作る
■サーバ編
[Rails][Linux]Apache+Passengerを入れる
[Xcode]Xcodeをインストールしてみる。
RubyのアプデにXcodeが必要だというので、必要に迫られダウンロード。。
そのうちアプリも作りだそう。
※インストールは2012/09/12時点の情報です。
参考サイト
絶対に挫折しないiPhoneアプリ開発入門Part.1 ~Xcode4.2でひよしまるを作ろう~ http://d.hatena.ne.jp/kazukingband/20111123
まずはここからダウンロード
https://developer.apple.com/xcode/
App Storeからのダウンロードを選択したので、この画面が表示。
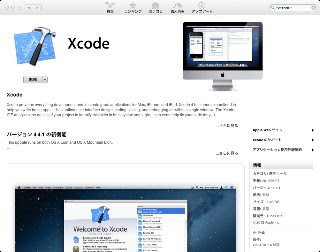


おおお。
これで完了!!
お疲れ様でした。
そのうちアプリも作りだそう。
※インストールは2012/09/12時点の情報です。
参考サイト
絶対に挫折しないiPhoneアプリ開発入門Part.1 ~Xcode4.2でひよしまるを作ろう~ http://d.hatena.ne.jp/kazukingband/20111123
まずはここからダウンロード
https://developer.apple.com/xcode/
App Storeからのダウンロードを選択したので、この画面が表示。
※App Storeのアップデートがあると、ダウンロードボタンを押してもエラーになるので、ソフトウェア・アップデートをかける必要がある
ダウンロードにはものすごーく時間がかかるので、根気よく待ちましょう。
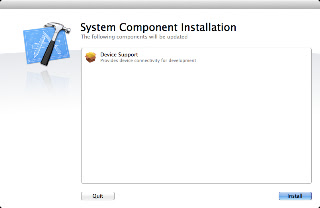
で、ようやくダウンロードが終わってインストール
利用規約を読んで(英語だけどw)、agreeをポチ
ついでにインストールするものが表示されているっぽいので、おとなしくinstallボタンをポチ
正常終了画面が出たら完了。
Start1Using Xcodeボタンを押すと、こんな画面が表示される。
これで完了!!
お疲れ様でした。
登録:
投稿 (Atom)